Explorer window
Customise the information displayed on thumbnails
3DBrowser has several display modes.
You can switch from one mode to another using the View / View / Custom menu. You can also use Ctrl+Mouse wheel to switch from one mode to another.
In this tutorial we'll look at how to change the custom view using the View / View / Custom menu.
 |
 |
|---|---|
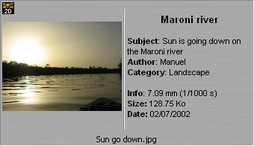
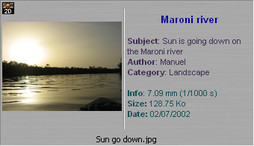
| This is what we want to display... | ...and you can add colours too! |
Here we go:
- Select View / View / Custom display mode.
- Open the Edit / Preferences dialogue box (Alt+P).
- Click on the Custom Display tab.
This dialogue box allows you to change the information displayed for 4 file types: Images / 3D / Audio and Other files. - Select Images from the drop down menu.
We will now change the information displayed for image files.
- Click in the edit box and edit or copy the following text:
<tagifexist><brttitle></tagifexist>
<tagifexist>
Subject: <brtsubject>
</tagifexist>
< tagifexist>
Author: <brtauthor>
</tagifexist>
< tagifexist>
Category: <brtcategory>
</tagifexist>

<tagifexist>Info: <bmapfocallength> (<bmapexposuretime>)</tagifexist>
Size: <brtfilename(size)>
Date: <brtfilename(lastwritedate(d))>
Here is an analysis of this script:
<tagifexist><brttitle></tagifexist>
- <brttitle> is replaced by the title you can edit for each file, see How do I change the title and description of a file?
- <tagifexist> and </tagifexist> can be found in the Conditional Tags menu. Thanks to these tags, the line will only be displayed if a title has been edited.
<tagifexist>Info: <bmapfocallength> (<bmapexposuretime>)</tagifexist>
- Tags can be found in Tags / Images / Camera & Shooting.
- This function displays the focal length and exposure time information contained in the EXIF information created by your digital camera.
- Tags can be found in Tags / Files - Description
- They show the size of the file and the time it was modified.
This information is always present and there is no need to insert conditional tags.
Viewing files in multiple folders
Viewing multiple folders in the same catalogue is very easy.
This feature has been available since version 8.3 and is a real convenience.
 |
 |
|---|---|
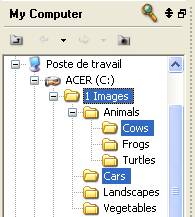
| Multiple selection with Ctrl on 1 Images, Cows et Cars |
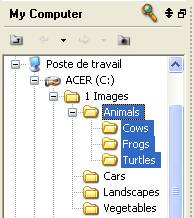
Multiple selection with Ctrl+Maj on the Animals folder |
- Press Ctrl, Shift or Ctrl+Shift and then click the folders you want to view at the same time.
- Ctrl adds or removes the folder from the current selection.
- Shift adds multiple folders to the current selection. 3DBrowser selects all folders between the focused folder and the clicked folder.
- Ctrl+Shift adds the clicked folder and its subfolders.
Note that subfolders are not displayed if they are not expanded in the tree.
To expand a folder and all its subfolders
- Right-click the folder you want to expand
- Select Expand All from the context menu: the folders are expanded.
Note: You can save the multi-folder catalogue as an album. Simply use the File / Save as... command and enter a name for your album.
Sort files as you like
Sorting files consists of ordering the thumbnails in the way you want, as sorting by name or file size can be of no interest.
The current displayed order is also important as it's used in several features. For example:
  Slides are displayed using the current displayed order in the _Slide Show_ feature.
  Files are printed using the current displayed order in the _Print Catalogue_ feature.
  Files are exported using the current displayed order in the _HTML Export_ feature.
  etc.
So let's get started:
- Select one or more files from the main window
- Left-click on one of the selected files and move the cursor without releasing the left button.
A blue line appears: it represents the new insertion point for the selected files. - Move the blue line between two thumbnails
- Release the left button: the files will be moved to your position.
This custom order will be maintained each time you open the directory if View / Arrange Icons / By Custom Order is checked.
You can delete the custom order using View / Arrange Icons / Delete Custom Order.
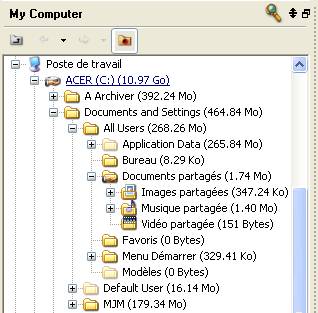
Display folder size to clean up your hard drive
3DBrowser can be used to perform unexpected tasks. Removing large files from your hard drive can be a long and tedious task and 3DBrowser can help you.
- Select the View / Display Directory Size command.
3DBrowser will start calculating the size of each folder as soon as you select this command. - In the tree view (F6 key) you will see a size information next to each folder.
This is a recursive size, i.e. it is the size of the folder and all its subfolders. - In the tree view, look for a large folder and then expand it until you find the subdirectory that contains a lot of data.
Select View / Show Directory Size again to hide the size information when you don't need it anymore.
Note: 3DBrowser calculates sizes in a background thread. If a given size is not yet computed or not updated, right click on a folder and select the Refresh Size command.
Associate a Sound to an Image
You might want to associate a sound to an image. Such association is useful in the Slides show feature as 3D Photo Browser automatically plays the sound associated to the image.
Suppose your image is called sample.jpg.
- Select the sound file. It should be in the same folder.
- Rename the sound file to sample (right click / rename).
Select Yes if 3DBrowser asks you to keep the file extension.
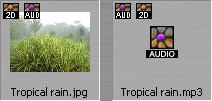
The two files are now associated. In thumbnails view mode, a second icon appears to notify such association.
When you'll rename or delete one of the file, 3DBrowser will asks you if the operation should be done on both files.