|
Using Polygon Cruncher
plugin
for Maya
|
|
|
 Setup Setup
In order to install Polygon Cruncher :
-
Run Setup.exe.
-
Select Polygon Cruncher and select a version of the Maya plugin for Polygon Cruncher that matches your Maya version.
-
Install Polygon Cruncher in the Maya plugin directory.
At the end of the setup process, several files have been added to your Maya folder, and particularly:
- A mll plugin that contains the Polygon Cruncher plugin
- Some mel files that handles the loading of the plugin, add the polyCrunch command and handle the interface of the plugin.
Run Polygon Cruncher for Maya
Once the setup has been performed, launch Maya then:
- Select one or more polygonal meshes.
- Open Mel script editor.
- Type polyCrunch in the editor and execute.
- A polygonCruncherNode is added to the selected meshes and a single polygonCruncherSettingsNode is created and connected to the selected meshes.
- Adjust the settings then click on the Calculate button and move the slider to optimize your meshes at the appropriate level.
Please look at the explanation related to the optimization settings on this page.
Accessing optimization settings
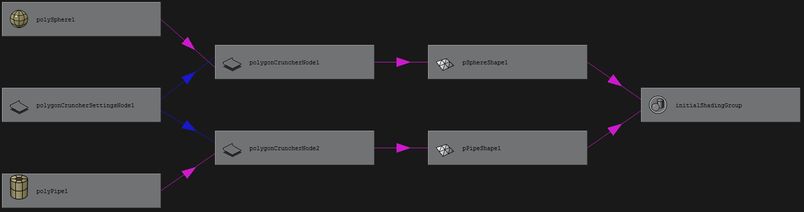
When running the polyCrunch command, 2 kind of nodes are created:
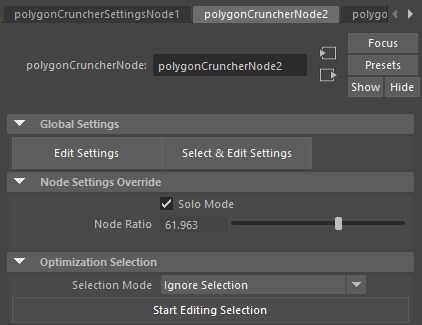
- polygonCruncherNode nodes which allows to adjust the optimization level individually for the given mesh, using the Solo Mode.
If this option is checked, this enable the optimization slider
that allows to adjust the level of details for this mesh specifically.
If this option is unchecked, the level of detail is controlled globally by the polygonCruncherSettingsNode optimization slider.
- ThepolygonCruncherNode allows to select a part of the mesh on which optimization is applied.
To select the vertices to optimize:
- Click on the button Start Edit Selection
- Select the vertices on the mesh using Select > Vertex / Face / Edge.
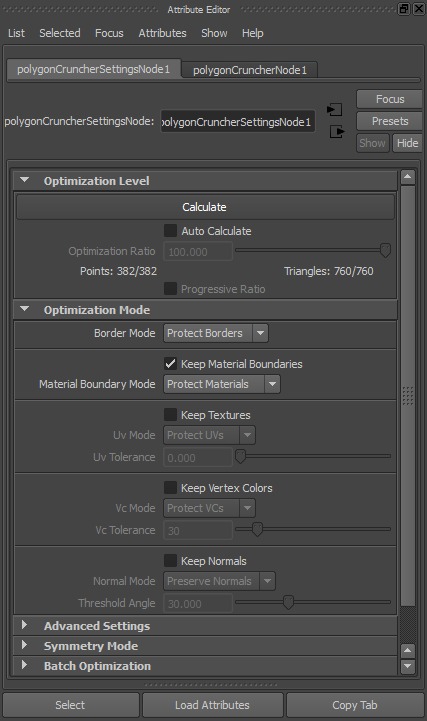
Two buttons give access to the polygonCruncherSettingsNode:
- Edit Settings display the optimisation dialogue without modifying the selection.
- Select & Edit Settings select all the meshes connected to the polygonCruncherSettingsNode and display the dialog.
- polygonCruncherSettingsNode handles the optimization settings.
These settings are applied to the meshes that were selected when running the polyCrunch command.
This node allows to adjust the optimization level globally for these meshes, excepting the one for which you check the Solo Mode in the
polygonCruncherNode panel.
 You can get access to these nodes in different ways: You can get access to these nodes in different ways:
| Window > General Editors > Display Layer Editor |
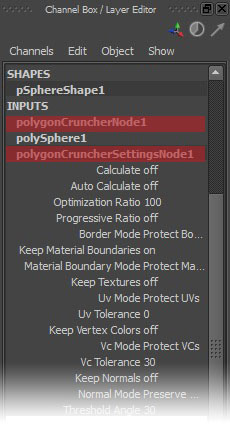 |
| Window > Attribute Editor |
 |
| Windows > Hypergraph: connections |
 |
Notes:
- The history must be turned on in order to use the plugin
- If several meshes have been selected before applying the command, these meshes are linked together. The optimization settings apply to all meshes.
- Polygon Cruncher can optimize only a part of the mesh. To select some vertices:
- Click on Start Editing Selection
- Select some vertices using Maya Select > Vertex (F9) command from the menu
- Click on Stop Editing Selection to validate the selection.
- Select Optimize Invert Selection if needed from dropdown menu
- Type help polygonCruncher; from MEL editor to get more information about the switch that can be used.
- Some attributes could be animated such the ratio attribute than can be driven from an external script.
Desinstallation
To uninstall Polygon Cruncher, use "Add/Remove programs" in the Windows control panel.
|